Main Dish

Recipe: Spicy Sichuan Noodles With Pac Choi

Sichuan-Noodles_4904-1.jpg

2021 Week 16 Newsletter

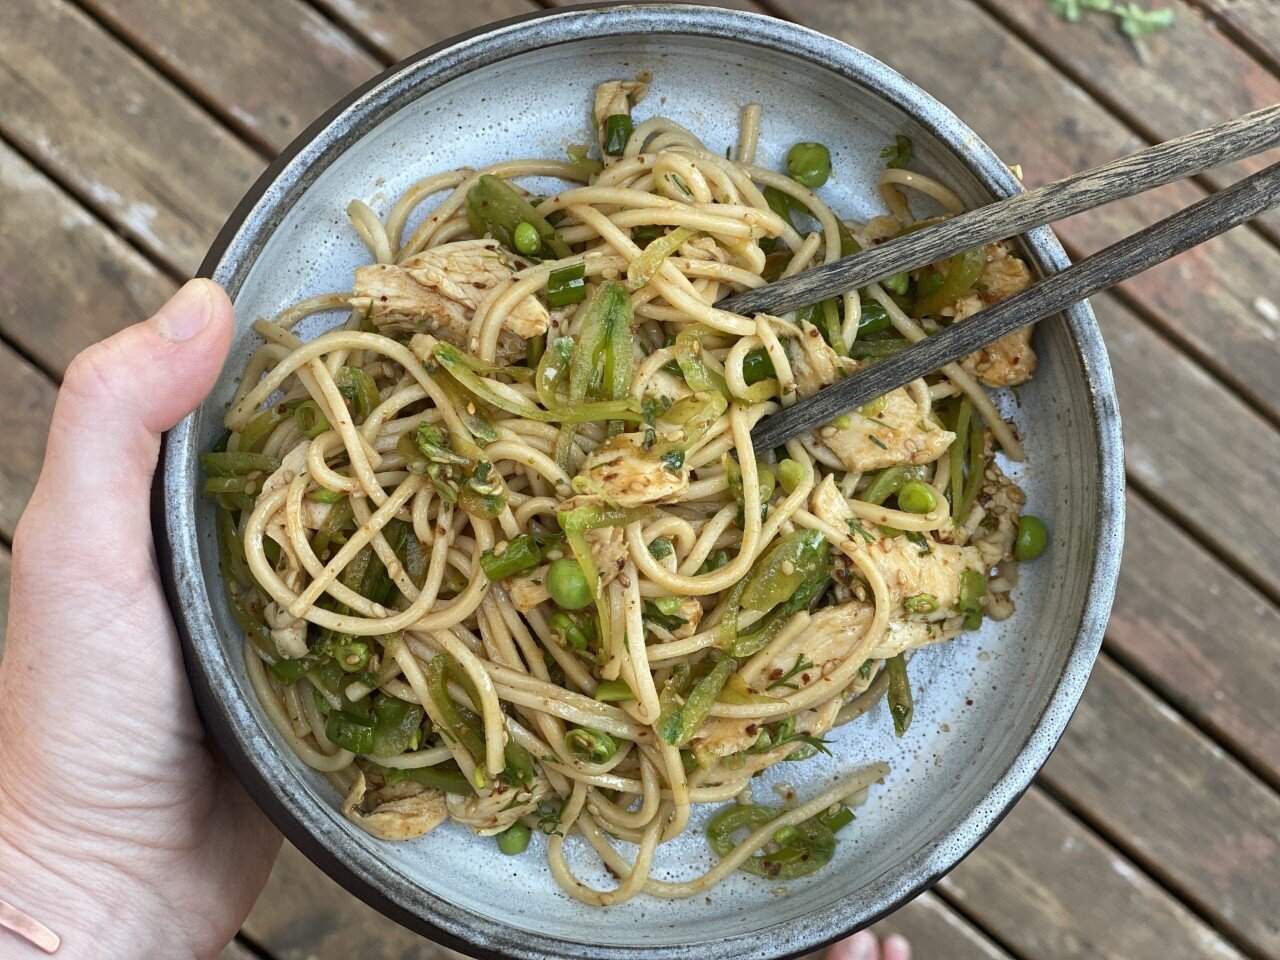
Recipe & Pic from Wild Greens & Sardines

This recipe is pretty much a meatless version of Dan Dan noodles (traditionally ground pork is the star attraction) but the sauce is so rich, creamy, and highly flavored that you won't for a minute feel like you are sacrificing deliciousness in favor of incorporating more veggies into your meal. You can purchase chili oil at the grocery store but if you have the time and inclination I highly recommend making your own (recipe included below)- you will be shocked at how many dishes it will find its way into!

~Rae


noodles
8-10 ounces dried or fresh ramen noodles (I usually use buckwheat soba noodles)
Bring a pot of salted water to a bowl. Drop in the pasta and cook until just al dente. Drop into a bowl of ice water to stop the cooking. Drain.
For the Tofu-Mushroom
1 tablespoon oil
4 ounces firm tofu, finely chopped
4 ounces mushrooms, any variety, chopped (I often use rehydrated dried shiitake mushrooms because that is usually what I have on hand in the pantry)
2 to 3 garlic cloves, minced
1 inch of ginger minced

1-2 heads of pac choi, chopped
1 teaspoon Shaoxing rice wine, Saki or dry Sherry
2 teaspoons soy sauce or tamari
Salt to taste
Heat a wok or large skillet over medium-high heat. Add a bit of oil and saute the pac choi until tender and wilted, set aside. Add the tofu and mushrooms and sauté until nicely browned. Add the garlic and ginger, and a little more oil if needed, and sauté another minute. Add the rice wine and soy and stir to combine. Fold the cooked pac choi into the mix and salt to taste.
For the Sauce
1 teaspoon Sichuan peppercorns
4 tablespoons soy sauce or tamari
2 teaspoons Chinese black vinegar
2 to 4 tablespoons Sichuan chile oil plus some flakes, depending on desired heat level (recipe below)
2 tablespoons tahini
Splash of pasta cooking water
Combine the Sichuan peppercorns, soy sauce, black vinegar, Sichuan chile oil and tahini in a bowl. Whisk to combine. Add a tablespoon or two of pasta cooking water, just to loosen up the sauce a bit.
Toppings
Thinly sliced scallions
Roasted, chopped peanuts
Ground Sichuan peppercorns

To Assemble
Spoon a few tablespoons of sauce in the bottom of each bowl. Layer half of the noodles on top. Spoon the tofu-mushroom mixture on top. Add thinly sliced scallions, chopped roasted peanuts and a pinch of Sichuan peppercorns. Add a little more sauce on top. Enjoy!

Sichuan Chile Oil
1/4 cup red pepper flakes, such as Korean chile flakes (Gochugaru)
2 teaspoons toasted and ground Sichuan peppercorn
3/4 cup oil, such as grape seed
1 cinnamon stick
1 star anise
1 tablespoon whole Sichuan peppercorns
3 bay leaves
2-3 slices ginger

Place the red chile flakes and ground Sichuan peppercorn in a heatproof bowl. Set aside.

Heat the oil with the cinnamon stick, star anise, whole Sichuan peppercorns, bay leaves and ginger in a pot over medium-high heat. Turn down the heat and simmer for 10 minutes.

Place a fine mesh strainer over the bowl with the chile flakes. Carefully pour the hot oil all over the chile flakes. Be careful, it will bubble up. Allow the oil to cool completely and allow the oil to infuse for at least 24 hours before using. Store in an air-tight container in the refrigerator for maximum shelf life.


Recipe: Braised Celery With Lentils & Garlic

BraisedCeleryLentil_6685_V1_final.jpg

2021 Week 16 Newsletter

Recipe and pic from Epicurious

A fantastic way to make the most of both your celery and garlic while providing a warm and hearty meal for your household! 


¼ cup plus 1 Tbsp. extra-virgin olive oil

1 bunch celery, leaves reserved, stalks sliced ½” thick on a diagonal

6–8 garlic cloves, thinly sliced

1 tsp. kosher salt, plus more

½ cup dry white wine or dry vermouth

A small handful hardy herb sprigs (such as rosemary, thyme, and/or sage; optional)

2½ cups low-sodium beef, chicken, or vegetable broth

2 cups Big-Batch Marinated Lentils

4 large eggs

Flaky sea salt

Freshly ground black pepper

Crusty bread (for serving; optional)


Heat ¼ cup oil in a large high-sided skillet over medium-high. Add celery and toss to coat. Cook, stirring occasionally, until celery is very lightly browned, about 5 minutes, then add garlic and toss to coat. Cook, stirring occasionally, until garlic is deep golden brown and celery is tender and golden brown, 5–7 minutes. Mix in 1 tsp. kosher salt, then add wine and herbs (if using) and stir to combine. Cook until wine is reduced by half, about 2 minutes. Add broth and bring to a boil; stir in lentils. Cook until lentils are warmed through and flavors have come together, about 5 minutes. Taste and season with more kosher salt if needed. Fish out herb sprigs if using and discard.

Heat remaining 1 Tbsp. oil in a large nonstick skillet over medium. Crack eggs into skillet and cover with a lid (or a baking sheet if you don’t have one), reduce heat to low, and cook just until egg whites are set but yolks are still runny, about 3 minutes.

Divide braised celery mixture among bowls. Top each with an egg and some celery leaves; sprinkle with sea salt and pepper. Serve with crusty bread, if desired.


Marinated Lentils

2½ cups French green or black beluga lentils, rinsed, picked through3 tsp. kosher salt, divided¼ cup extra-virgin olive oil¼ cup sherry vinegar or red wine vinegar½ tsp. honey¼ tsp. hot smoked Spanish paprika or Hungarian sweet paprika

Combine lentils and 2 tsp. salt in a large saucepan and pour in cold water to cover by at least 1”. Bring to a boil, then reduce heat to low and simmer gently until lentils are tender but still have some bite (like al dente pasta), about 20 minutes. Drain and return to pot.

Meanwhile, whisk oil, vinegar, honey, paprika, and remaining 1 tsp. salt in a small bowl or measuring glass.

Pour vinaigrette over hot lentils and toss to coat. Let sit at least 10 minutes before serving to give lentils time to absorb flavors from vinaigrette.

Do ahead: Lentils can be prepared 5 days ahead. Transfer to an airtight container; cover and chill.

Recipe: Chard & Potato Enchilladas

chard enchiladas.jpg

2021 Week 15 Newsletter

Recipe & Pic from Anathoth Garden

Once upon a time I didn't even know what chard was, let alone how incredibly versatile it is! This recipe is a great way to use up multiple veggies in your box in one go while putting something just a little different on the dinner table. *You can add a protein such as pork, sausage or chicken if desired, simply chop it up small and cook until browned then add the filling before rolling tortillas.

~Rae


Vegetable Oil

Salt

1/2 lb. Yukon gold potatoes, cut into 1/2 inch cubes

Salt and pepper

1/2 lb (1 bunch) Swish Chard (stems and leaves washed, dried and chopped)

1 medium onion, chopped

3-4 garlic cloves, minced

3/4-1 lb pepper jack cheese, shredded

8 tortillas, either corn or flour

1 jar (12-14 oz) salsa, as hot as you like

Sour cream and sliced green onions for topping


Heat a couple tablespoons of oil in a large skillet; cook the potatoes until golden brown. Place on a paper towel and season with salt and pepper as desired.

Add the chard stems to the skillet. Cook until beginning to soften.

Add the onions and garlic and cook until softened.

Add the chard leaves and cook until wilted. Remove from heat.

Add the potatoes and 1 cup of the cheese to the mix and toss together.

Preheat an oven to 350 deg.

Put ½ cup or so of the salsa to a baking dish.

Add 2 tablespoons or so of the mixture to a tortilla and roll up, placing in the dish seam side down. Repeat for all the tortillas. *If using corn tortillas, cook in the skillet for a few seconds to soften before filling.

Top the tortillas with the rest of the salsa and spread the rest of the cheese evenly over the top.

Bake until the cheese is melted and the filling is beginning to bubble.

Serve with sour cream and green onions on the top.

Recipe: Black Bean & Roasted Pepper Quesadillas

quesadilla.jpg

2021 Week 15 Newsletter

Recipe and pic from Nourish & Fete

When I'm looking for something easy, filling, and tasty in a way that will please even my picky five year old daughter, quesadillas are where I turn! This recipe is a great way to incorporate the peppers from your box this week- top with chopped cilantro or some salsa fresca! 

~Rae


2 peppers: all sweet or a sweet and hot combo, your choice!

3 teaspoons olive oil divided

1 teaspoon kosher salt divided

1 small yellow onion finely chopped

3 cloves garlic minced or pressed

3/4 teaspoon ground cumin

1/2 teaspoon ground chipotle chili powder

1/8 teaspoon ground cayenne pepper

2 (15 ounce) cans black beans drained and rinsed

1 cup chicken or vegetable broth

juice of 1 lime

1 cup shredded cheese monterey jack, colby jack, or any Mexican blend is terrific

8 flour or corn tortillas

sliced avocado or salsa as desired, for serving


Preheat the oven to 400 degrees F (approximately 200 degrees C) and line a rimmed baking sheet with aluminum foil. Slice the tops and bottoms off the peppers, cut into quarters, and remove seeds along with the inner white membranes. Arrange peppers on the prepared baking sheet, drizzle with 1 teaspoon olive oil, and sprinkle with 1/4 teaspoon kosher salt. Bake for 20-30 minutes, turning peppers about halfway through, until the skins are blackened and slightly charred. Remove from oven and set aside; when cool, coarsely chop.

To make the black beans, heat remaining 2 teaspoons olive oil in a skillet over medium-high heat. Add the onion and cook until it just begins to soften, about 5 minutes. Stir in the garlic, cumin, chipotle chili powder, cayenne pepper, and remaining 3/4 teaspoon kosher salt; saute about 30 seconds, just until fragrant.

Stir in the beans followed right away by the broth. Bring to a brisk simmer, then reduce heat to medium-low and continue simmering gently until beans are tender and most liquid has been absorbed, about 10 minutes. Remove from heat, stir in lime juice, and adjust seasonings to taste.

To assemble quesadillas, warm a non-stick skillet over medium-high heat and place a tortilla on the surface. Sprinkle a thin layer of cheese evenly over the surface of the tortilla, followed by a thin layer of beans and a sprinkling of chopped red peppers. Finish with an additional thin layer of cheese, then top with another tortilla.

Using a spatula, gently press down on the top tortilla, and cook until both layers of cheese begin to melt. Gently flip the quesadilla, and cook for 1-2 minutes more on the other side. Remove to a cutting board, slice into wedges, and serve with avocado or salsa as desired.

Recipe: Basil Fried Rice

Thai Basil Fried Rice7-M.jpg

2021 Week 14 Newsletter

Recipe and Pic from Seonkyoung Longest

I LOVE Basil, and when I get to that point in the summer when I have had just about enough pesto and caprese salad (I know, is that even possible?) this is where I turn! This type of recipe typically calls for Thai Basil, but Italian Basil works just as well. If you don't have a shallot try subbing in some of the yellow onion from your box! 

~Rae


3 to 5 garlic cloves

1 to 5 Thai chili to your taste

1 medium shallot

2 tbsp oyster sauce (you can substitute withvegetarian oyster sauce)

1tbsp fish sauce (you can substitute with Thai light soy sauce)

1 tbsp palm sugar or honey

1/4 tsp black or white pepper

2 tbsp unsalted butter

12 oz 16/20 extra jumbo shrimp, peeled & deveined

2 eggs

2 1/2 cups day old cold jasmine rice

handful basil


Pound garlic and thai chili together in a mortar and pestle. This way the natural oil form chili and garlic will be release and will make the fried rice more fragrance. You could carefully smash with knife and chop if you don’t have mortar and pestle. Set aside. Slice shallot and set aside along with garlic and chili.

Mix oyster sauce, fish sauce, palm sugar and pepper in a small mixing bowl, set aside.

Heat a large skillet or a wok over high heat until smoking. Add butter, garlic, chili shallot and shrimp. Stir fry everything and cook the shrimp 1 minute each side, then mix everything in the wok and push to a side of the wok.

Crack 2 eggs in the wok. Let the eggs cook a bit then scramble the eggs. When eggs are cooked but still silky, toss everything together.

Add cold rice and pour sauce mixture. Toss everything together until rice is coated evenly with the sauce, about 2 to 3 minutes.

Toss in basil and turn off the heat. Keep tossing until basil is well combined with the fried rice.

Transfer to a serving dish and enjoy when it’s hot!

Recipe: Crispy Tofu & Broccoli With Sesame Peanut Pesto

1bowlvert_680.jpg

2021 Week 14 Newsletter

Recipe & Pic from Alexandra Cooks

Crispy or charred Broccoli is just so addictive! This wonderfully light yet flavorful dish is perfect on its own or served with your favorite cooked grain. Some julienned Basil would punch up the flavor even more! Try substituting caramelized storage onions for the green onions for a bit of extra sweetness. 

1 block (12- to 15-oz) firm or extra-firm tofu

1 pound broccoli

3 tablespoons olive oil

salt and pepper to taste

1 tablespoon soy sauce or tamari

1 tablespoon cornstarch

FOR THE PESTO:

1 tablespoon toasted (or not) sesame seeds

1/4 cup peanuts, roasted (salted are fine)

1.5 tsp minced fresh ginger

1 small garlic clove

2 tablespoons soy sauce

2 tablespoons sesame oil

1 tablespoon rice vinegar

1/4 teaspoon sugar or other sweetener

TO FINISH:

3 scallions, thinly sliced

chili-garlic or other hot sauce

Prepare the tofu: Drain the tofu, and place it on a few paper towels; place a few more towels over it. Place a heavy object—like a big frying pan—over the tofu, and let it rest for 10 minutes (and up to 30 , if you have the time) to press out the excess liquid. (I like to do this on a cooling rack set over a pan, see photos below).

Heat the oven to 400ºF. Line one rimmed sheet pan with parchment (for the tofu); leave another one bare (for the broccoli).

Prepare the broccoli: Trim and chop the broccoli into florets. Don’t discard the stems (they are so good!): peel off the tough outer skin and knots, then cut the stems into 1/2-inch rounds. Drizzle 1 tablespoon of the oil over the bare sheet pan, swirl it to coat, scatter the broccoli over top, drizzle with another tablespoon of oil, season generously with salt and pepper, and toss to coat with your hands. Spread into an even layer.

Remove the tofu from the towels, and cut into 1-inch cubes. In a large bowl, gently toss the tofu with the remaining tablespoon of oil, the soy sauce, and the cornstarch until evenly coated. Spread out on the parchment-line sheet pan.

Cook the tofu and broccoli: Place both sheet pans in the oven and roast for 20 minutes, then toss the pieces around for even coloring and roast another 10 minutes. At this point, the tofu is usually done, which is to say golden at the edges and lightly crisp. Remove the pan from the oven. If necessary, roast the broccoli for another 10 minutes to get an extra char on it.

Meanwhile make the pesto: Pulse all of the ingredients together in a food processor until ground. Adjust the flavors to taste. If the sauce is super thick, you can thin it with some water.

To finish: In a large bowl, combine the broccoli and tofu, and toss with some of the sauce. Garnish with the scallions. Serve  extra sauce and hot sauce, if using, on the side.

Recipe: Tuscan Ribollita Soup

Tuscan-Ribollita-Soup-6-1365x2048.jpg

2021 Week 12 Newsletter

Recipe & Pic from The Original Dish

I don't want to suggest that we're anywhere near Soup Season (otherwise known as Fall), perish the thought! But since the evenings have been a bit chilly recently I thought I'd share a recipe for a delicious soup that will incorporate several of the veggies in your box this week! 

~Rae


¼ olive oil, plus more as needed

1 medium onion, diced

4 medium carrots, peeled + diced

2 celery stalks, diced

4 garlic cloves, very thinly shaved or minced

kosher salt

freshly cracked black pepper

2 tbsp tomato paste

¼ tsp red pepper flakes

1 cup red wine

1 can (28 oz) crushed tomatoes (or the equivalent amount of chopped fresh tomato)

1 qt chicken stock

1 parmesan rind

½ lb fresh, crusty whole grain bread, torn into ½” pieces

1 large bunch swiss chard, stemmed + roughly chopped

1 (15 oz) can butter beans, rinsed + drained

garnishes: red pepper flakes, chopped parsley, freshly grated parmesan cheese


Heat a large, heavy-bottom pot or Dutch oven over medium heat. Add the olive oil. When the oil is hot, add the onion, carrots, and celery. Let sauté for about 8 minutes until tender and slightly caramelized. Season with salt and black pepper. Stir in the garlic and let cook for another minute or so.


Stir in the tomato paste and red pepper flakes. Let cook and caramelize for about 2 minutes. Pour in the red wine. Simmer for another 2 minutes. Add the tomatoes, chicken stock, and parmesan rind.


Bring the soup to a boil, and then reduce the heat to medium-low. Simmer the soup for about 30 minutes, stirring occasionally.

Meanwhile, heat a large skillet over medium heat. Coat the bottom with a generous amount of olive oil. Add the torn bread and toast until golden and crispy, stirring often. Season with a pinch of salt.


Stir the swiss chard and butter beans into the soup and heat through. When you’re ready to serve, stir in the bread. Taste the soup and season with salt and black pepper to taste.


Serve the soup with a drizzle of olive oil, a sprinkle of red pepper flakes, a good amount of freshly grated parmesan cheese, and parsley over top.

Recipe: Pasta With Chard & Brown Butter

pasta with chard and brown butter.jpg

2021 Week 12 Newsletter

Recipe & Pic From Alexandra Cooks

This is a super simple way to add your chard (or other hardy leafy green) to a pasta dish! Try including other roasted veggies (like peppers), chopped tomatoes, or even just a bit of basil. 


8 cups (about 9 oz.) packed baby Swiss chard, baby kale or spinach*

1 tbsp. kosher salt

1/2 lb. (8 oz.) orecchiette

6 tbsp. unsalted butter

1 cup walnuts

a handful (about 1/4 cup) of grated Pecorino or Parmigiano

salt and freshly cracked pepper, to taste


Place greens in a large bowl and cover with cold water. Let sit for five minutes to allow any dirt to settle. Scoop greens from water and place in a large colander to drain. Any water clinging to the leaves is just fine.

Fill a large pot with water and bring to a boil. Add the tablespoon of salt and stir in the pasta.

In a large sauté pan (large enough to fit the pasta and greens) melt the butter over medium heat. Once the butter begins turning brown and smelling nutty, turn off the heat.


Meanwhile, in a small sauté pan over medium heat, toast the walnuts until they become lightly browned and fragrant, about 10 minutes. (Alternatively, toast the walnuts on a baking sheet at 350F for 8 to 10 minutes—watch closely to prevent burning.) Place the toasted walnuts in a tea towel and rub together to remove papery skin. Transfer walnuts to a sieve and shake again to remove any additional skin. I know this is fussy, but it makes a difference. Set aside.

Boil pasta till al dente. Reserve one half cup of the cooking liquid and set aside—you might not even need this, but it can be nice to have on hand. Drain pasta directly over the colander filled with the greens.


Bring the brown butter back up to temperature over medium or medium-high heat; add the pasta and greens to the pan. Add the walnuts and toss to coat. Grate cheese over top and toss again. Taste. Add more salt (if you have salted the cooking water with the tablespoon of kosher salt, you shouldn’t have to add too much more salt) and pepper to taste. If necessary add some of the pasta cooking liquid to the pan—it’s nice to have reserved pasta cooking liquid on hand if you make this ahead and need to reheat it, but just beware that the cooking liquid is salty. Serve pasta, passing more cheese on the side.


Recipe: Black Beans & Rice With Roasted Peppers & Garlic

roasted-poblano-garlic-black-beans-rice-7.jpg

2021 Week 12 Newsletter

Recipe & Pic from The First Mess

This is another one of those great cheap and easy flex dishes that can be instantly changed up depending on what toppings/garnishes you are feeling! Try some sliced avocado and a dollop of sour cream and scoop it up with tortilla chips or spoon it into taco shells. Throw a fried egg on top for some extra protein and include a side salad with a creamy dressing- beans and rice don't have to be boring! 


1 teaspoon cumin seeds

1 teaspoon coriander seeds

1-2 sweet peppers of choice

1 fresh jalapeno

½ medium white onion, sliced

1 cup cherry tomatoes, halved or 1 cup chopped

3 garlic cloves, peeled

1 tablespoon avocado oil

sea salt and ground black pepper, to taste

1 cup brown basmati rice, rinsed thoroughly

1 15½ oz can black beans, drained and rinsed

1 tablespoon tomato paste

½ teaspoon soy sauce

2 ¼ cups filtered water

juice of 1 lime

handful chopped cilantro


Preheat the oven to 400°F. Line a baking sheet with parchment paper.

In a small-medium soup pot or medium braiser-style pot, dry toast the cumin and coriander over medium heat until fragrant. Transfer the toasted spices to a spice grinder and grind until spices are powdered. Set aside.

Remove the stems and seeds from the sweet peppers and jalapeno. Cut the peppers into rustic, 2-inch-ish pieces and place them on the baking sheet.

Place the sliced onions, tomatoes, and garlic cloves on the baking sheet as well. Toss the vegetables with the ground cumin and coriander, avocado oil, salt, and pepper. Slide the vegetables into the oven and roast for 20 minutes, or until lightly browned and uniformly soft.

Let the vegetables cool slightly before transferring to a blender or food processor. Pulse the mixture a few times until you have a chunky paste. You’re just trying to avoid large pieces of garlic and chili. Scrape this mixture into the soup pot from earlier.

Add the rice, beans, tomato paste, soy sauce, and water to the pot. Set the pot over medium heat and bring to a boil. Lower the heat to a simmer and cover. Cook the rice and beans for 40 minutes, or until most of the liquid is absorbed and the rice is tender. Check the pot and stir every 10-15 minutes or so. Add more water if necessary.

Take the pot off the heat and let it sit for 5 minutes with the lid on. Then, remove the lid and stir in the lime juice, cilantro, and a good pinch of salt. Serve the black beans and rice hot.

Recipe: Blistered Green Beans & Tomatoes

GreenBeansTomatoes.jpg

From 2021 Week 11 Newsletter

Recipe & Pic From Dishing Up The Dirt

When most of us were growing up, charred bits on your food meant you had overcooked things and dinner was ruined, but we have since learned to love the slightly bitter, slightly smoky flavor of blistered veggies. This is a great way to use your crisp beans, succulent tomatoes, and pungent garlic all in one dish- it's the epitome of summer abundance! 


1/4 cup butter or cooking fat of choice

1 lb green beans, trimmed

fat pinch of salt

1 1/2 cups cherry tomatoes

4 large cloves of garlic, finely chopped

1 jalapeño pepper, finely chopped

2 Tablespoons low sodium soy sauce

1/4 cup thinly sliced basil (optional)


Heat 2 Tablespoons of the butter in a large cast iron pan over medium-high until melted. Add the green beans (you may need to do this in batches) and cook, covering the pan as needed if the butter is spattering until browned underneath. About 3 minutes. Using tongs flip the beans and brown on the other side for a few more minutes. Continue to cook and turn beans until they are lightly blistered on all sides. Remove the beans to a plate and set aside. Add the remaining butter to the pan and toss in the tomatoes. Cook, undisturbed for about 2 minutes or until they blister up a bit on the bottom. Toss the tomatoes and cook for one more minute. Add the garlic and jalapeño and continue to cook, tossing every so often until the garlic is browned, the pepper is softened and the tomatoes are blistered. Add the green beans back to the pan and drizzle in the soy sauce. Toss everything together and throw in the basil. Taste for seasonings and adjust if needed.

Recipe: Linguini With Roasted Fennel

fennel-pasta-with-breadcrumbs-7.jpg

2021 Week 9 Newsletter

Recipe From Platings & Pairings

This recipe makes the most of fennel's delicate anise-flavored sweetness while also satisfying all of your cravings for something indulgently rich and creamy! You might also try tossing the pasta with a basil (or fennel frond) pesto.


10 Ounces Fresh Linguine

1 Fennel Bulb

1 Tablespoon Olive Oil

2 Tablespoons Butter

⅓ cup Part-Skim Ricotta Cheese

3 cloves Garlic (minced)

1 Lemon (zested and quartered)

¼ cup chopped basil

1 Shallot (minced)

¼ Cup Breadcrumbs

Salt and Pepper


Preheat the over to 450.

Slice fennel bulb into ½in strips, toss with olive oil and salt and pepper, and roast 18-20min, or until tender and golden. While the fennel roasts combine the ricotta with the juice of two lemon wedges and season with salt and pepper to taste. Melt butter in a large skillet and cook garlic and shallot until fragrant and browned. Add breadcrumbs and toast until browned. Transfer to a small bowl and wipe out the pan.

Combine lemon zest, juice from the remaining two lemon wedges, ½ cup water, and 2 tbs olive oil in the skillet- heat to boiling, stir to combine, and remove from heat.

Cook the pasta until al dente, drain, and add it to the skillet with the sauce. Add fennel and cook, stirring occasionally until pasta is well coated in the sauce.

Remove from heat, toss with basil, and top with breadcrumbs and ricotta. 

Recipe: Breakfast Pizza With Scallions

Onion-Egg-Pizza-008.jpg

2021 Week 9 Newsletter

Recipe From A Couple Cooks

If you've never put eggs on a pizza before this may seem a little crazy but trust me, you'll never go back! This is such a great flex recipe as well- smear some pesto on the dough before adding the eggs and cheese, throw some chopped tomatoes on top, or roasted fennel! Round the whole meal out with a caprese or green salad on the side (or piled on top!).


1 ball of your favorite pizza dough

4 green onions

¾ cup shredded mozzarella cheese

½ cup shredded Pecorino Romano cheese

2 eggs

Olive oil

Kosher salt


Place a pizza stone in the oven and preheat to 475°F. OR preheat your pizza oven (here’s the pizza oven we use).

Prepare the toppings: Slice the green parts off of the scallions so they form long ribbons. In a small skillet, heat ½ tablespoon olive oil. Add the scallions and sauté until slightly tender, stirring, for 1 minute. Remove from the heat.

When the oven is ready, dust a pizza peel with cornmeal or semolina flour. (If you don’t have a pizza peel, you can use a rimless baking sheet or the back of a rimmed baking sheet. But a pizza peel is well worth the investment!) Stretch the dough into a circle; see How to Stretch Pizza Dough for instructions. Then gently place the dough onto the pizza peel.

Quickly assemble the pizza: Brush olive oil over the dough and sprinkle with kosher salt. Sprinkle with the mozzarella cheese, then the Pecorino cheese. Top with scallions. Carefully crack two eggs on top and sprinkle with a bit of kosher salt.

Bake the pizza: Transfer the pizza to the pizza stone using the pizza peel, and bake until the egg white is set and the yolk is still runny, about 7 minutes.

Recipe: Roasted Aloo Gobi

Image from Bon Appetit

Image from Bon Appetit

2021 Week 6 Newsletter

Recipe from Priya Krishna's “Indian-ish”

Priya Krishna's method for this recipe means you can cook the veggies ahead of time and then throw them in a pan with the spices and onions whenever you are ready to get dinner on the table- especially helpful on summer days when you want to get most of your cooking out of the way in the cool hours of the morning. I really enjoy this served with a quick sauce of yogurt mixed with minced garlic, a bit of hot pepper, salt, and a squeeze of lime juice. 

~Rae


2 medium russet potatoes, cut into 2"-long sticks

1 medium head of cauliflower, cut into small florets

5 Tbsp. extra-virgin olive oil, divided

1 tsp. cumin seeds

½ tsp. ground turmeric

1 small onion, finely chopped

1 Tbsp. thinly sliced ginger

Pinch of asafetida (optional, but really great)

Pinch of red chili powder

1 tsp. (or more) kosher salt

1 Tbsp. (or more) fresh lime juice

½ cup chopped cilantro leaves with tender stems


Preheat oven to 400°. Line a rimmed baking sheet with foil. Toss potatoes and cauliflower with 3 Tbsp. oil on prepared sheet. Spread in an even layer and roast, tossing once halfway through, until cauliflower and potatoes are browned and slightly crisped, about 30 minutes. Let cool.


Meanwhile, heat remaining 2 Tbsp. oil in a large skillet over medium-high until it begins to shimmer. Add cumin and cook, stirring frequently, until they turn a medium shade of brown, about 1 minute. Reduce heat to medium and swirl in turmeric. Add onion and cook, stirring frequently, until translucent, 4–6 minutes. Add ginger, asafetida (if using), and chili powder and cook, stirring, until heated through and well combined, about 1 minute longer.


Stir in roasted potatoes and cauliflower, including any charred bits from the foil, and gently mix (don’t overmix, or the cauliflower will fall apart). Add salt and cook, tossing occasionally, until potatoes and cauliflower are tender (but not soggy!), 5–6 minutes. Remove from heat and add lime juice. Taste and add more lime juice or salt, if needed.


Transfer potatoes and cauliflower to a platter. Top with cilantro.

Recipe: Escarole With Beans & Pasta

cropped-pasta-escarole-beans.jpg

2021 Week 5 Newsletter

Recipe From Cooking With Nonna

Nothing makes a classic Italian Wedding Soup like escarole, but last time we checked it didn't really seem like good soup weather, so here's an alternative that will bring you similar Italian flavors without the heat!


1/4 cup extra virgin olive oil

6 cloves garlic, sliced

1/4 teaspoon red pepper flakes

3 anchovy fillets packed in oil (optional)

1/4 cup dry white wine

1/4 cup chicken broth

1 head escarole, trimmed, washed and coarsely chopped

1 19oz can cannellini beans, rinsed

salt and pepper as desired

1 pound Rigatoni

grated Pecorino Romano cheese for sprinkling


Put a large skillet with a lid over a medium flame and heat the oil. Add the garlic and cook for 30 seconds. Add in the anchovies and cook until they have melted, about 30 seconds to 1 minute.

Add in the wine and cook for 1 minute.

Add the escarole to the pan and cook until the leaves are wilted, about 3-5 minutes.

Add in the beans and using a wooden spoon, mash about half of them.

Add the chicken broth to the pan and lower the flame to a simmer. Cover and cook until the escarole is tender, about 5-7 minutes. Uncover and cook another 2 minutes. Taste for seasoning and season with salt and pepper as desired.

Lower the flame to low while the pasta cooks.


Drop the rigatoni into a large pot of generously salted boiling water and cook until al dente.

Drain and add the pasta to the pan. Toss over medium-high heat for 1-2 minutes.

Serve in warm bowls with a sprinkle of grated pecorino romano cheese.

Recipe: Bang Bang Chicken & Noodle Salad With Snap Peas

Pic from Rae’s kitchen

Pic from Rae’s kitchen

2021 Week 5 Newsletter

Rae’s Favorite!

If you aren't already familiar with it, Bang Bang Chicken is a delicious and refreshing Sichuan dish consisting of shredded poached chicken and julienned cucumber tossed with a sweet, spicy, and tangy dressing. In this recipe I add in some Chinese egg noodles to make it a meal and sub in snap peas for the cucumber. In my opinion it is a pretty flexible recipe so feel free to experiment with adding in any sweet crunchy veggie, chopped greens, or other protein of your choice- it's really the sauce that makes it perfect each time! (Thanks to The Woks Of Life for the original sauce ingredients) 

~Rae


2 tbs light soy sauce

4 tsp Chinese black vinegar (or rice vinegar)

2 tbs sugar

1½ tbs sesame oil

1 tbs chili oil (or to taste)

2 tbs toasted sesame seeds

1 tsp ground Sichuan peppercorn (optional)

 ½ tsp salt

2 tbs finely chopped scallions

About ½ a package dried Chinese egg noodles or Soba noodles

2 tbs chopped cilantro

½ lb chicken breast

1 bag sugar snap peas sliced thin on the diagonal (you can also leave them whole if you prefer) 


First poach your chicken: Place the meat in a small pot, sprinkle with a pinch of salt, a few peppercorns, a handful of stems from your cilantro, and a slice or two of ginger. Pour in just enough water to cover, bring to a simmer, and cook for about 5min. Remove the pot from the heat and let it sit, with the lid on, for about 20 min. Remove from water and let cool then shred. 


To make the sauce: Combine soy sauce, vinegar, sugar, sesame oil, chili oil, salt, and sichuan peppercorn (if using). Set aside.


Cook noodles according to package instructions and plunge into cold water to chill. 


Add noodles, chicken, sesame seeds, sliced sugar snap peas, chopped cilantro, and scallions to a large bowl and toss gently to combine. (Try sautéing your pac choi with some garlic and oyster sauce and serving it as a side to this salad!)

Recipe: Radish Sandwiches

Pic from The Splendid Table

Pic from The Splendid Table

Week 3 Newsletter

Recipe from The Splendid Table

Not only is this another wonderful hot weather meal, the butter in the recipe will also tame the spiciness of your radishes (just a tip if you're trying to introduce a picky eater)


1 standard-size baguette

6 tablespoons unsalted butter, room temperature

1 tsp flaky sea salt

1 bunch radishes, trimmed, washed, and thinly sliced

1 small handful salad greens of choice

Pinch fresh garden herbs such as chives or tarragon (optional)


Slice the baguette lengthwise and crosswise, creating 4 quarters. Place the bread on a cutting board cut sides up. Spread each quarter with softened butter, and sprinkle with salt. Pile sliced radishes onto each quarter, pressing them firmly into the butter. Lay the greens and herbs across the bottom quarters, and top with the corresponding tops. Press down on the halves firmly with your palms. Place the sandwiches on a cutting board and cut into small sandwiches or hors d’oeuvres.

Recipe: Collard Wontons

Pic From Two Red Bowls

Pic From Two Red Bowls

2021 Week 1 Newsletter

From Two Red Bowls

These are a huge hit in my household (especially with my 5yr old who normally won't eat anything green)! I use one package of wonton wrappers and fry up any leftover filling in little patties to eat as a snack. Try the wontons in the broth recommended in the recipe or serve them with dipping sauce as a side dish to noodles with stir-fried Pac Choi!

~Rae


for the wontons:

½ pound collard greens, roughly chopped

1 pound ground pork

¼ cup thinly sliced scallions (2 to 3 scallions)

1 tablespoon finely grated ginger root

3 tablespoons Shaoxing rice wine, dry sherry, or sake

2 tablespoons sesame oil 2 tablespoons soy sauce

1 tablespoon sugar (optional)

½ teaspoon salt

¼ teaspoon white pepper 70 to 80 wonton wrappers

(15 to 16 ounces, or about 1⅓ packages; keep unused wrappers covered in plastic wrap, sealed

in a Ziploc bag, and frozen for later use)

for the broth:

4 cups water

4 cups chicken broth

1 to 2 teaspoons soy sauce, for serving

½ teaspoon sesame oil, for serving

¼ cup thinly sliced scallions (2 to 3 scallions), for serving


Bring a large pot of water to a boil over high heat. Add the greens and reduce the heat to medium. Simmer until the greens are bright green and beginning to turn tender, but still have some bite, 10 to 15 minutes. Drain and add to a food processor. Pulse until finely shredded.


In a large bowl, combine the greens, pork, scallions, ginger, rice wine, sesame oil, soy sauce, sugar (if using), salt, and white pepper. Using chopsticks or a wooden spoon, stir vigorously until all ingredients are well combined and the filling forms a thick paste.


Prepare a small bowl of water for sealing the wrappers. For each wrapper, place 1 teaspoon of filling in the center. Dab a bit of water on one edge and fold the wrapper in half, taking care to seal the wrapper well around the filling. Dab water on one corner of the folded seam and bring the two folded corners together to form a small bundle. Place on a tray and repeat. You should end up with 70 to 80 wontons. To save them for later, freeze on the tray, then place in a Ziploc bag. They’ll keep in the freezer for up to 6 months.


When you’re ready to cook the wontons, in a large pot, bring the water and chicken broth to a boil. Add about 20 wontons, stirring gently to ensure they don’t stick to the bottom of the pot. Cook until the water comes back to a boil and the wontons float to the surface, about 2 minutes. Using a slotted spoon, transfer the wontons to plate. Repeat with the remaining wontons until they’re all cooked, or freeze a portion of the uncooked wontons for later. To cook from frozen, use the same method, but boil for 4 to 6 minutes, until the wontons float.


To serve, divide the wontons among several small bowls and ladle a bit of the cooking broth over each bowl. Drizzle lightly with soy sauce and a few drops of sesame oil, and top with scallions. Enjoy immediately.

Recipe: Chicken & Collard Greens Spring Rolls

Image from Eating Well

Image from Eating Well

from Eating Well

10 collard leaves (about 8 ounces)

½ cup rice vinegar

3 ½ cups water, divided

1 tablespoon light brown sugar

¼ cup smooth natural peanut butter

¼ cup reduced-sodium tamari

1 large clove garlic, minced

3 scallions, trimmed and cut into 2-inch pieces

1 stalk lemongrass, cut into 2-inch pieces

1 1-inch piece fresh ginger, sliced

1 pound boneless, skinless chicken breast, trimmed

⅛ teaspoon salt

2 ounces thin rice noodles or rice sticks

2 tablespoons toasted sesame oil, divided

1 cup grated beet

1 cup grated carrot

¾ cup fresh basil leaves

¾ cup fresh mint leaves

1 tablespoon sesame seeds

Step 1

Bring a large pot of water to a boil. Set a large bowl of ice water next to the stove. Lay a collard green flat, with the thicker part of the stem that runs down the middle of the leaf facing up and the shiny, bright green side down. Using a sharp knife, shave off the thick stem so it's almost flush with the leaf. Trim any of the remaining stem from the base of the leaf, reserving all shaved and trimmed pieces. Repeat with the remaining leaves. Cut all the stem pieces into 2- to 3-inch lengths.

Step 2

Cook the leaves in the boiling water in 3 batches until soft but still pliable, 1 to 2 minutes, then transfer to the ice water until cool. Drain and pat dry.

Step 3

Bring vinegar, 1/2 cup water and brown sugar to a boil in a small saucepan. Add the collard stems and reduce heat to maintain a simmer. Cover and cook until tender, about 15 minutes. Remove from heat and let stand for 10 minutes. Remove the stems from the pickling liquid and set aside.

Step 4

Transfer 1/4 cup of the pickling liquid to a small bowl (discard the remaining liquid). Whisk in peanut butter, tamari and garlic. Set aside.

Step 5

Combine the remaining 3 cups water, scallions, lemongrass and ginger in a large saucepan. Bring to a boil. Add chicken and reduce heat to maintain a bare simmer; cook until an instant-read thermometer inserted in the thickest part of the meat registers 165 degrees F, 12 to 15 minutes. Transfer the chicken to a clean cutting board. Shred and season with salt.

Step 6

Using a slotted spoon, remove the solids from the chicken-poaching liquid and discard. Return the liquid to a boil. Add noodles and cook according to package directions. Drain, transfer to a bowl and toss with 1 tablespoon sesame oil.

Step 7

To assemble spring rolls: Lay a collard leaf on a clean cutting board. Place 2 tablespoons chicken in the center and top with about 1 tablespoon each of the noodles, beet, carrot, basil, mint and pickled stems. Fold both sides of the leaf over the filling and, starting with the open end closest to you, roll into a tight cylinder. Repeat with the remaining leaves and filling. Brush the rolls with the remaining 1 tablespoon sesame oil and sprinkle with sesame seeds. Serve with the reserved peanut sauce.

Recipe: Tomato Zucchini Focaccia

tomato-zucchini-focacchia-1.jpg

from A Family Feast

5 cups bread flour plus up to 2 cups more

2 teaspoons salt

2 teaspoons instant yeast

2 cups room temperature water

6 tablespoons extra virgin olive oil plus more to mist over dough

1 pound zucchini, sliced thin using a mandoline

1 large or two medium eating tomatoes such as beefsteak, sliced thin

1 teaspoon kosher salt

½ cup oil cured Italian olives, pitted

1 cup Romano cheese, freshly grated

Herbed oil

1 ¼ cups extra virgin olive oil

½ cup fresh basil, chopped

2 tablespoons fresh flat leaf parsley, chopped

1 ½ teaspoons kosher salt

½ teaspoon large grind black pepper

1 ½ teaspoons garlic powder

In the bowl of a stand mixer with the dough hook attachment, place 5 cups of the flour along with salt and yeast and mix to combine.

Add all of the water and 6 tablespoons of the oil and mix on medium speed to form a sticky dough. After 3-4 minutes of mixing, the dough should be pulling away from the sides but still be stuck to the bottom. If the dough is still sticking to the sides, add a little more flour until just the bottom sticks. Mix for a total of four more minutes on medium.

Pour out a cup of bread flour onto your counter and spread out to about a 6×6-inch square and using a bowl scraper, scrape the dough into the center of the flour.

Shape the dough by stretching into a small neat rectangle about 10×4. Does not have to be exact. Dust the top with flour and let this sit for five minutes.

Grab the left and right sides, stretch and fold towards the center making the same rectangle size only now three layers thick. Spray the top with olive oil from a mister, then dust with more bread flour. Cover with plastic and let sit 30 minutes.

Repeat the same method by stretching, folding, misting and dusting and again let rest covered 30 more minutes.

Repeat one last time but after you cover it, let it sit for 90 minutes.

During the time the dough rests, you will dry roast the vegetables and make the herbed oil.

Set oven to 250 degrees F.

Line three sheet pans with parchment and spray with pan spray.

Lay out the sliced zucchini on two pans and the tomato on the third, sprinkle with salt and bake for about an hour or so flipping the vegetables half way through. Bake until the slices are dried and slightly shriveled and just starting to brown. I rotated the three pans in my oven so each had a turn one each rack since the bottom rack cooked the quickest. Once done, cool, cover and refrigerate until next day.

To make the herbed oil, microwave the oil to 110 degrees F and add all of the other herbed oil ingredients. Set this aside.

Once the dough has rested the final 90 minutes, line a sheet tray with parchment paper and using a brush dipped into the herbed oil, brush the parchment paper liberally. (the herbs should have settled, let them stay that way and just dip the brush into the top oil)

Place the dough onto the oiled pan and press to fit the dough to the pan. Don’t worry about getting it into the corners. When it proofs the next day, it will fill up the pan.

Once the dough is pressed into the pan, use your finger tips to press dimples into the dough all over the top then spoon some of the herbed oil over the top (this time stir first and use the herbs). Cover with plastic and refrigerate for the next day and up to three days.

Three hours before baking, remove the dough from the refrigerator and lay out the tomato slices and zucchini slices all over the top to about a half inch from the edges. Pit the olives and flatten with your fingers and scatter over the top. Spread the rest of the herbed oil all over the top. It will seem like a lot but as the bread bakes, it absorbs the oil.

Cover with plastic and a dish towel and let sit on your counter for three hours.

15 minutes before the three hours is up, preheat oven to 500 degrees F.

Place the pan in the oven on the center rack, lower the temperature to 450 degrees F and bake for 10 minutes.

Rotate pan 180 degrees and bake for 7-10 more minutes or until it is just starting to brown.

Sprinkle on the Romano cheese and bake for five more minutes or until golden brown then remove from the oven.

Immediately slide the now baked focaccia off of the pan and onto a cooling rack. If the parchment paper slides out with it, slip it out from beneath the bread and let the bread cool for at least 20 minutes.

Slide the bread from the cooling rack onto a cutting board and cut 4X4 (16 pieces) or if you want smaller pieces, cut four the short way and five the long way for 20 pieces.

Store leftover bread in the refrigerator.

Recipe: Grilled Cabbage With Sausage

Image from Feasting At Home

Image from Feasting At Home

from Feasting At Home

1 large purple cabbage

olive oil for brushing

salt and pepper

4–6 Andouille Sausages ( I used chicken, feel free to use vegan sausage)

Mustard Seed Vinaigrette:

2 tablespoons whole grain mustard

2 tablespoons apple cider vinegar

1 tablespoon olive oil

1 ½ tablespoons honey

¼ teaspoon salt

¼ teaspoon pepper

1 tablespoon fresh chives

Pre heat grill on high heat.

With the stem side pointing down, using a sharp chefs knife to slice cabbage into thin slices no thicker than ½ inch thick. Cut the core out, making a “v” —  or keep it in for easier grilling.

Clean and grease the grill well. Brush each side of cabbage with olive oil and season with salt and pepper. lower grill to med-high. Add sausages and cabbage. Grill each side of cabbage for 6-8 minutes, closing grill. You want cabbage slightly soft, but not completely collapsing. You can lower heat further, if slices are thicker, to get them to cook through. Grill the sausages until seared and plumped.

Place cabbage steaks down on a large plater. Spoon half of the dressing over top. Slice the sausages in half and steep diagonal and scatter over cabbage. Spoon remaining dressing over sausage.

Garnish with chopped chives and scatter with chive blossoms.