Farm Favorite

Brats With Sweet Onions & Hard Apple Cider

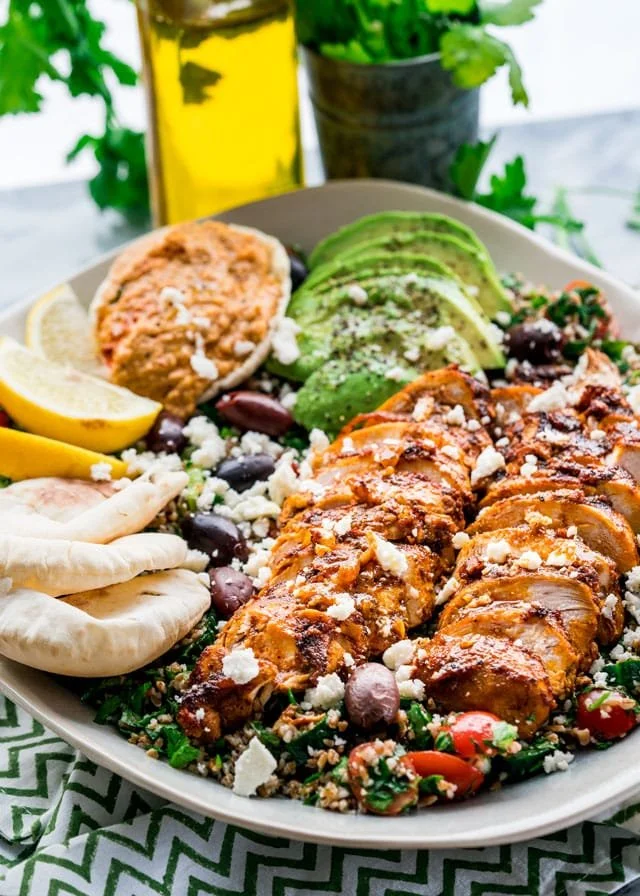
Recipe & Pic from The Rising Spoon

Pile these brats and onions up on buns with mustard and sauerkraut or serve them with posted new potatoes- either way you'll have a hearty meal after a day of summer play!

2-3 tablespoons of cooking oil (like butter, ghee, avocado oil, or olive oil)

2 medium sweet onions, peeled & thinly sliced (use your tropea onions!)

1 teaspoon of sea salt

1 teaspoon of cracked black pepper

8 pork bratwursts (fresh, not pre-cooked)

1 (12 oz) can or bottle of hard apple cider (sub chicken broth, fresh apple cider, or water for a non-alcoholic version)

Melt 1-2 tablespoons of butter over medium heat in a large (12-inch) skillet. Stir in the sliced onions, sea salt, and pepper. Cook the onions for 5 minutes, stirring occasionally. Use a wooden spoon to remove the onions from the skillet & set aside in a bowl.

Increase the heat to medium-high, add another tablespoon of butter, followed by the brats. Cook the brats 1-2 minutes per side (or until they've formed a nice brown sear - this should happen quickly).

Add the onions back to the skillet, spreading them in between all the brats, and slowly pour in the hard apple cider. Bring the cider to a simmer, cover with a lid, reduce heat to medium-low, and cook for 15-20 minutes, or until the brats are no longer pink (you can check their internal temp to be sure - 160 degrees or more).

Remove the cooked brats from the skillet and set aside to rest. Keep the skillet uncovered, crank the heat to medium-high, and cook the onions, stirring occasionally, until most or all of the liquid has reduced (about 10 minutes). If you have an extra 10-15 minutes, continue to cook the onions until they are dark & caramelized.

Place the brats back into the skillet (with the heat off) to keep warm until you're ready for the meal.

Chicken Shawarma Tabbouleh Salad

Recipe & Pic from Jo Cooks

Another hot-weather entrée salad that will help keep you cool this week!

Chicken

2 teaspoon smoked paprika

1/2 teaspoon turmeric

2 teaspoon ground cumin

1/2 teaspoon cinnamon

2 teaspoon pepper or to taste

1 teaspoon salt or to taste

1/4 cup lemon juice from about 2 lemons

1/2 cup olive oil

1 teaspoon red pepper flakes

4 cloves garlic minced

1 pound chicken breasts boneless and skinless

1 large onion sliced

Tabbouleh Salad

2 cups water

1 cup bulgur wheat uncooked

1/4 cup olive oil

1/4 cup lemon juice (from 1 or 2 lemons, depends on size)

3 cups tomatoes chopped small

1 cucumber chopped small

1/4 cup green onions chopped (use your Tropea onions!)

2 cups fresh parsley chopped

1/4 cup fresh mint chopped

1/4 teaspoon salt or to taste

1/4 teaspoon pepper or to taste

Other Optional Ingredients

1/4 cup feta cheese crumbled

1/2 cup Kalamata olives

pita bread

hummus

1 avocado sliced

In a 8×8 baking dish add the smoked paprika, turmeric, cumin, cinnamon, pepper, salt, lemon juice, olive oil, red pepper flakes, garlic, and whisk well. Add the chicken, sliced onion and toss making sure the chicken is well coated in the marinade. Cover with plastic wrap or foil and refrigerate for at least an hour. The longer the meat marinates the more flavor you’ll have.

Preheat the oven to 425 F degrees.

Bake uncovered until the chicken is browned and crisp on the edges, and cooked through. It should take about 40 to 45 minutes. If you want the chicken crispier on top, turn the broiler on to high and broil for 3 minutes until nice and crispy on the outside.

Let the chicken rest for 5 to 10 minutes before slicing.

Tabbouleh Salad

While the chicken is baking, prepare the tabbouleh salad. Add the water to a small pot and bring to boil. When the water is boiling add the bulgur and cover. Reduce heat to a simmer and cook for about 5 minutes or until all the water is absorbed. Stir occasionally. Let the bulgur cool before adding to the salad.

Add the bulgur to a large bowl, then add the remaining ingredients. Toss well.

To assemble the salad, spread the tabbouleh salad over the bottom of a large shallow plate. Arrange with sliced chicken, sliced avocado, Kalamata olives and sprinkle some feta cheese over the top. Serve with hummus and pita bread.

Nicoise Salad

Recipe & Pic from Love & Lemons

Entrée salads are perfect for hot days- so fresh, so filling! This French Classic is also a great way to use up many of the veggies in your box this week at once!

8 ounces small yellow or red potatoes

4 ounces fresh green beans, trimmed

¾ cooked white beans, drained and rinsed

3 hard boiled eggs, halved

4 artichoke hearts, drained and halved

1 cup quartered radishes and/or sliced cucumber

1 cup cherry tomatoes, halved

½ cup Niçoise or Kalamata olives, pitted and halved

2 tablespoons capers, drained

2 tablespoons chopped parsley

Flaky sea salt, such as Maldon

Freshly ground black pepper

Lemon Vinaigrette

1/4 cup fresh lemon juice

1 small garlic clove, grated

1 teaspoon Dijon mustard

1/4 teaspoon sea salt, more to taste

Freshly ground black pepper

1/2 teaspoon honey or maple syrup, optional

1/4 to 1/3 cup extra-virgin olive oil

1/2 teaspoon fresh or dried thyme, optional

Place the potatoes in a large pot and cover with cold water by about 1 inch. Stir in 1 teaspoon of salt. Bring to a boil, then reduce the heat and simmer, uncovered, until fork-tender, 10 to 15 minutes. Drain the potatoes and when cool enough to handle, slice in half or quarters.

Refill the pot with water, bring it to a boil, and set a bowl of ice water nearby. Drop the green beans into the boiling water and blanch for 2 minutes. Drain and immediately immerse in the ice water. After 1 minute, drain and place on a kitchen towel to dry.

Assemble salad with the potatoes, green beans, white beans, eggs, artichokes, radishes, tomatoes, olives, and capers. Drizzle generously with the lemon vinaigrette. Sprinkle with parsley and season to taste with salt and pepper.

Creamy Lemon Zucchini Pasta

Recipe & Pic from Bon Appetit

If you still have zukes leftover from last week and are having a ‘oh no, more zucchini, what do I do with all of this??’ moment, you might want to give this recipe a try!

2 lb. zucchini or summer squash (4–6)

1 large shallot or ½ small onion (try using one of your sweet onions!)

4 large garlic cloves

3 Tbsp. extra-virgin olive oil

¼ tsp. crushed red pepper flakes

2 tsp. Diamond Crystal or 1¼ tsp. Morton kosher salt

Freshly ground black pepper

12 oz. spaghetti, linguine, bucatini, or other long pasta

1 lemon

½ oz. Parmesan, plus more for serving

½ cup (lightly packed) basil

½ cup heavy cream

Bring a large pot of water to a boil and salt heavily.

Meanwhile, place a clean kitchen towel in a large bowl (or on a large cutting board). Trim 2 lb. zucchini or summer squash (4–6), then grate on the large holes of a box grater directly into towel. Peel 1 large shallot and grate on the large holes of grater into towel. Peel 4 large garlic cloves and grate on the small holes of grater into towel.

Gather ends of towel together, then squeeze over bowl (or the sink) with all your might to extract water from the zucchini. Squeeze until it’s hard to get out any more liquid. You should have extracted about ⅔ cup zucchini liquid, just FYI; discard.

Heat 3 Tbsp. extra-virgin olive oil in a medium Dutch oven or very large skillet over medium-high. Add ¼ tsp. crushed red pepper flakes and cook, stirring, until fragrant, about 30 seconds. Add zucchini mixture (unwrap the balled-up towel over the pot for easiest transfer) and 2 tsp. Diamond Crystal or 1¼ tsp. Morton kosher salt and stir to coat. Season generously with freshly ground black pepper. Cook, stirring occasionally, until zucchini mixture is jammy, thick, and starting to stick to bottom of pot, 15–20 minutes.

When the zucchini has been cooking 5–10 minutes, add 12 oz. spaghetti, linguine, bucatini, or other long pasta to pot of boiling water and cook until al dente. Scoop out 2 cups pasta cooking liquid and set aside.

Meanwhile, juice 1 lemon into a small bowl. Grate ½ oz. Parmesan on the small holes of grater (you should have about ¼ cup; you can also use ¼ cup pre-grated Parmesan). Very coarsely tear or chop ½ cup (lightly packed) basil or mint leaves.

Using tongs, transfer pasta to pot with zucchini—it’s okay if some water clings to it. Reduce heat to medium-low, add ½ cup pasta cooking liquid and ½ cup heavy cream, and stir to combine. Add cheese, pour another ½ cup pasta cooking liquid over top, and cook, stirring vigorously with tongs or a wooden spoon and add more pasta cooking liquid if needed, until a creamy sauce that coats pasta forms, 2–3 minutes.

Remove pasta from heat and stir in 2 Tbsp. lemon juice. Taste and season with more salt and black pepper and add more lemon juice (you may want to add an additional 1 Tbsp.). Stir in most of the herbs.

Serve pasta topped with more grated Parmesan and remaining herbs.

Grilled Pizza With Pesto, Arugula, & Feta

Recipe & Pic from Saving Dessert

It's going to be way too hot to turn on your oven, but that doesn't mean you can't enjoy some pizza this week- so light up your grill and make something tasty! Ready-made dough from the grocery store is just fine to use if you don't feel like making your own.

4 balls of pizza dough

2 cups arugula

1 cup crumbled Feta

1 cup prepared pesto

Preheat your grill as hot as you can get it. Oil the grate then quickly slice the rolled out pizza dough onto the grill. Grill for a minute or two until the bottom is cooked and the top starts to bubble up. Quickly turn the pizza dough over and grill for another 2-4min.

Repeat with the remaining dough and top each pizza with pesto, arugula, and feta.

Japanese Quick Pickled Cucumbers

Recipe & Pic from Onolicious Hawaii

A wonderful way to quickly pickle cucumbers without having to stand over a pot of hot brine! Throw some poke or seasoned chilled shrimp over a bowl of rice and garnish with these pickles and you'll have a filling and heat-wave-ready meal!

1 large cucumber

2 teaspoons salt

1 tablespoon sugar

¼ cup rice vinegar

Thinly slice the cucumber and place in a mixing bowl.

Sprinkle salt on the cucumbers, toss. Let sit for 10 minutes. Drain the water.

In a small bowl, dissolve the sugar in the rice vinegar. Pour over the salted cucumbers.

Cover and let sit in the fridge for at least 1 hour. Ready to eat!

Moroccan Spiced Carrots With Lamb

Recipe & Pic from Dishing Up The Dirt

I share this carrot recipe every year because it is just so darn good and it's a great way to push carrots from a snack or side dish to a foundational part of a full meal. I recommend piling everything up on one big plate (garnish with some of your parsley) and serving with a bowl of pita or sliced crusty bread for scooping!

~Rae

1 bunch carrots, sliced in half lengthwise

1-2 tablespoons olive oil

1/2 teaspoon ground cumin

1/2 teaspoon paprika

1/2 teaspoon ground cinnamon

salt and pepper

Lamb

1 tablespoon olive oil

1 bunch of scallions, minced (white and light green parts only, reserve the tops for garnish)

1 clove of garlic, minced

1 teaspoon ground coriander

1/2 teaspoon ground cumin

1/4 teaspoon ground cinnamon

1 teaspoon fine sea salt

a few grinds black pepper

1 pound ground lamb (ground beef is a fine substitute!)

Yogurt Sauce

1 cup plain sheep's milk, goat's milk, or cow's milk yogurt

1 clove of garlic, minced

2 teaspoons fresh lemon juice

1/2 teaspoon fine sea salt

2 teaspoons extra virgin olive oil

Preheat the oven to 425F. Toss the carrots with the oil, spices, salt and pepper. Place in a single layer on a baking sheet and roast in the oven until lightly browned and tender. About 30 minutes. Toss the carrots halfway through cooking.

Heat a large skillet over medium-high heat. Add the oil to the pan, swirl to coat. Add the scallions, garlic, coriander, cumin, cinnamon, salt, pepper, and lamb. Cook, stirring occasionally, until the lamb is cooked through, 5-7 minutes.

Prepare the yogurt sauce by whisking together all the ingredients in a bowl.

Spread a thin layer of the yogurt sauce onto four plates, top with the carrots and then top with a few spoonfuls of the lamb mixture. Sprinkle with minced scallion tops and serve.

Egg Sandwich With Frisee

2022 Summer Week 3 Newsletter

Recipe & Pic from Never Not Hungry

This decadent egg sandwich (or “Sarnie” if you're a Brit like my dad) is absolutely worthy of having breakfast for dinner! Try subbing in some chopped scapes for the garlic chives for a bit of extra flavor.

~Rae

2 ciabatta rolls, halved

1 small head frisée, core removed, chopped into bite-sized pieces and thoroughly rinsed and dried

4 slices bacon, halved and cooked until crisp (reserve skillet and fat)

2 large eggs

1 tablespoon butter

Chopped fresh chives

DRESSING:

Reserved bacon fat

Half of a small shallot, finely minced

1 teaspoon Dijon mustard

1 generous tablespoon red wine vinegar

Kosher salt and freshly ground black pepper, to taste

To make the goat cheese butter: combine the softened butter and goat cheese and mash until thoroughly mixed. Set aside.

Toast the ciabatta rolls until lightly golden brown. Spread the goat cheese butter all over both sides.

Heat the reserved bacon fat over medium heat until hot. Add the shallot and a pinch of salt; sauté until slightly softened, about 2 minutes. Whisk in the red wine vinegar and Dijon mustard. Remove from the heat and season to taste with salt and pepper. Add to the frisée, tossing to coat.

In a large nonstick skillet with a lid, heat the butter over medium heat until melted. Add the eggs and season with salt and pepper; cover and cook until the whites are set and the yolk is still runny, about 3 minutes.

Place the dressed frisée on the bottom half of the ciabatta rolls. Add the bacon slices on top. Place a fried egg on each sandwich and sprinkle with chives.

Pickled Garlic Scapes

2022 Summer Week 3 Newsletter

Recipe & Pic From Running To The Kitchen

From burgers to salads, to charcuterie boards, these pickles are a delicious topping or snack. Alice loves adding in fresh dill to make a garlic scape version of dilly beans!

1 large bunch of garlic scapes (about 1/2 a pound)

apple cider vinegar

2 cups water

2 tablespoons Kosher salt

1 tablespoon raw (turbinado) sugar

1/2 teaspoon peppercorns

1/2 teaspoon mustard seeds

It’s important to start with clean, sterilized jars for this process.

Trim off any dry, dead ends then cut the garlic scapes into sizes that fit the jars you’re using. You can leave them curled and make them wrap around the jar or, cut into smaller straight pieces to fit the height of the jars.

Place the scapes into the jars and add the peppercorns and mustard seeds.

Combine the apple cider vinegar, water, salt and sugar in a medium sauce pot. Bring to a boil and stir the mixture until the salt and sugar are dissolved.

Pour the hot liquid into the jars covering the garlic scapes completely but leaving about 1/4″ headspace in the jars.

Loosely affix the lids to the jars and leave out at room temperature to cool. Once cooled, tighten the lids and refrigerate for at least 2 weeks before consuming.

For more intense pickled flavor, leave unopened in the refrigerator for 3-4 weeks before enjoying.

Recipe: Hasselback Potatoes With Garlic Confit

2021 Week 24 Newsletter

Recipe & Pic FRom Potato Goodness

The garlic confit portion of this recipe requires quite a few cloves, so if you have been saving up your heads from your CSA box this is a great way to make the most of your stash. Otherwise, feel free to leave the garlic confit out, and just brush your taters with a little garlic infused oil.

4-6 medium russet potatoes

Coarse kosher salt

Freshly ground black pepper

For the Garlic confit: (you will have some left over but can be used for other dishes)

½ cup light olive oil or neutral oil

4 tablespoons unsalted butter

½ cup garlic cloves, peeled but left whole

A few sprigs thyme

Heat the oven to 425°F / 220ºC with a rack in the lower-middle position.

Make the garlic confit: Heat the oil and unsalted butter in a saucepan over medium-low heat until it reaches 220º F. Reduce the heat to low, add the thyme sprigs and garlic, and cook until they are soft and lightly golden brown, 20-25 minutes. It should be lightly bubbling away but not spitting oil or smoking. Take the thyme out after 15 minutes or so (it will have given up all it’s flavor and just get dark). Make sure to keep the temperature below 260ºF or it can burn. Stir the garlic occasionally to make sure they brown evenly. Set aside to cool.

Scrub the potatoes clean and pat them dry with a paper towel. Cut slits 1/8 inch to ¼-inch apart in the potato, stopping just above the bottom so that the slices stay connected. (Laying a wooden spoon or chopsticks next to the potato makes this easier. Cut straight down and stop when the knife hits the spoon).

Arrange the potatoes in a baking dish or cast iron skillet, cut side up. Brush the potatoes all over with the garlic oil, including the bottoms (don’t try to get oil in the slits yet). Sprinkle the potatoes generously with salt and pepper. Bake the potatoes for 30 minutes.

At this point, the layers will begin to separate. Remove the pan from the oven and brush the potatoes again with the garlic oil — you can gently open the layers slightly if they’re still sticking together. Make sure to get the oil down into the space between the slices.

Bake for another 20-30 minutes, until the potatoes are starting to crisp on the edges. Remove the pan from the oven once more and tuck four or five roasted garlic cloves between the slits of each potato (every few leaves should get one). Return to the oven and bake another 10-20 minutes until the edges are crisp and brown and the center can be easily pierced with a paring knife).

Serve immediately while hot and crispy!

Recipe: Thai Winter Squash Curry

2021 Week 24 Newsletter

Recipe & Pic From Little Spice Jar

A flavorful and warming dish that will welcome any variety of winter squash that you might have on hand! Serve with basmati rice topped with crushed nuts, cilantro, and lime wedges.

1 tablespoons coconut oil (or any oil really)

1 large shallot, chopped (or onions or leeks)

2-2 ½ cups diced winter squash (about 1.5 pounds)

1 tablespoon grated ginger

2-3 tablespoons red curry paste

½ tablespoon yellow curry powder

1 (15 ounce) can coconut milk

¾ cup vegetables or chicken broth

2 teaspoons fish sauce (omit for vegans/vegetarians)

2 teaspoons sugar

Heat the oil in a large, deep skillet over medium high heat. Add the shallots and saute them for 5-6 minutes or until they just begin to get golden. Add the squash and grated ginger, stir to coat with the oil.

Add the red curry paste, yellow curry powder and stir until all the squash is nicely coated. Continue to cook the curry paste for 2-3 minutes or until it's fragrant. Add the broth, coconut milk, fish sauce, and sugar. Let the sauce come to a simmer before covering. Lower the heat and allow the squash to cook all the way through, about 12-18 minutes. You'll know it's done when you can easily pierce the squash with the tip of a knife.

Recipe: Creamy Celeriac, Kohlrabi, & Fennel Soup

2021 Week 23 Newsletter

Recipe Adapted From Feasting At Home

A creamy, decadent tasting soup that incorporates 3 delicious cool-weather veggies! The parsley oil garnish is optional but if you have some celery leftover from last week, give it a try (or sub in cilantro!)

1 large fennel bulb, cored and diced ( about 1 ½ cups)

½ onion-diced ( 1 cup)

1–2 Tablespoons olive oil

1 grapefruit-sized celeriac- peeled and diced ( about 2 cups)

1-2 kohlrabi- peeled and diced

8 Cups Chicken or Veggie stock

¼ teaspoon white pepper

salt to taste

¼ cup creme fraise or sour cream for garnish ( optional)

Parsley oil -for garnish- ( optional)

1 Cup packed Italian parsley ( stems ok)

½ Cup olive oil

½ clove garlic

¼ teaspoon kosher salt

2 teaspoon lemon juice

In a large heavy bottom pot, saute diced onion in 1-2 Tablespoons olive oil, over medium high heat until tender, about 5 minutes. Add fennel. Turn heat to medium-low and saute until fennel begins to caramelize, stirring occasionally about 12 minutes. Add celeriac, kohlrabi, pepper and 8 cups chicken stock.

Turn heat to high, bring to a simmer, lower heat, cover, and continue simmering until celeriac and kohlrabi are very tender, about 15-20 minutes.

Using a blender, blend until smooth -in batches, only filling blender 1/2 full. (Remember when blending any hot liquid, cover the blender lid firmly with a kitchen town, and only fill blender 1/2 full, and start on the lowest speed, to prevent a blender explosion.)

Return to the pot. Warm before serving and adjust salt.

Garnish with a swirl of creme fraise or sour cream (optional) and a little drizzle of parsley oil.

Parsley Oil

Pulse all ingredients in a blender or food processor until combined.

Recipe: Twice Roasted Carrots With Honey & Almonds

2021 Week 23 Newsletter

Recipe from Six Seasons: A New Way With Vegetables, Pic from Alexandra Cooks

The perfect roasted carrots with just the right balance of sugar and acid. Try pairing with your favorite grain or roasted meat.

1½ to 2 pounds carrots, trimmed and peeled, but left whole

Extra-virgin olive oil

2 tablespoons white wine vinegar or white balsamic

Kosher salt and freshly ground black pepper

2 tablespoons unsalted butter, cut into small pieces

2 tablespoons honey or maple syrup

Heat the oven to 475°F.

Spread the carrots on a rimmed baking sheet, drizzle on a tablespoon or so of oil, and roll the carrots to coat them. Roast until they are very dark brown, even a bit burnt on the edges, but not fully tender, 10 to 12 minutes. Note: I am still without an oven, and my little Waring oven doesn’t really get above 400ºF, so the first roast for me takes about 30 to 45 minutes—just roast the carrots till they look nearly charred on all surfaces. Leave the oven on but reduce the temperature to 300°F.

When the carrots are cool enough to handle, cut them on a sharp angle into 1/2-inch-thick slices and transfer to a large bowl. Add the vinegar, season with salt and lots of pepper, and toss to coat. Let the carrots sit for 5 minutes to absorb the vinegar.

Spread them out on the baking sheet again, distribute the butter bits on top, and drizzle the honey or maple syrup over all. Roast until they are fully tender and the butter and honey are making a lovely mess, 5 to 7 minutes. Note: Again, because my oven is a little guy, this step takes longer—just cook until everything looks caramelized. Scrape everything into a serving bowl, taste, and adjust with more vinegar, salt, or pepper. Top with the almonds. Serve warm.

Recipe: Ginger & Collard Fried Rice

2021 Week 23 Newsletter

Recipe & Pic from Soul: A Chef’s Culinary Evolution in 150 Recipes

Try adding some soul food flavor to a classic Asian dish with Collards! The greens are shallow-braised rather than being fully immersed in liquid, and the rice soaks up all of that nutrient-packed pot liquor!

1 bunch young collard greens (1⁄2 pound)

2 tablespoons vegetable oil

1 extra-large chicken egg

1 teaspoon kosher salt

1/2 teaspoon freshly ground black pepper

1 shallot, thinly sliced

2 garlic cloves, smashed and very thinly sliced

1 (1-inch) piece fresh ginger, peeled and grated (about 2 teaspoons)

3 tablespoons rice wine vinegar

2 tablespoons reduced-sodium soy sauce

1 tablespoon mirin

2 cups cooked white rice

1 teaspoon sesame oil

4 scallions, thinly sliced

1 jalapeño chile, very thinly sliced

1 teaspoon sesame seeds

1 lime, cut into 8 wedges

Red pepper flakes (optional)

Fill a sink with cold water. Place a cutting board nearby. Stack 4 collard green leaves on top of each other. Remove the stems with a sharp knife, and trim 2 inches from the bottoms of each stem. Cut the stems into 1⁄8-inch pieces. Cut the leaves into 2-inch squares. Repeat with remaining leaves. Rinse the leaves and stems in cold water. Drain.

Heat 1 tablespoon of the vegetable oil in a medium sauté pan or skillet over medium. Break the egg into the pan, and cook 4 minutes, gently shaking the pan occasionally to ensure the egg does not stick. Sprinkle with the salt and pepper. Turn the egg, and cook 2 more minutes. Transfer to a plate, and keep warm.

Heat the remaining 1 tablespoon vegetable oil in the sauté pan over medium. Add the shallot, garlic, and ginger. Cook, stirring occasionally, until shallot is translucent. Add the collard leaves and stems to the pan; cook, stirring constantly, 1 minute. Stir in the vinegar. Stir in the soy sauce and mirin. Stir in the rice, and cover. Simmer until the rice is heated through, about 2 minutes. Uncover and drizzle with sesame oil. Remove from heat, and let stand 2 minutes.

Transfer the fried rice to a serving bowl. Cut the fried egg into 1⁄8-inch-thick strips. Top the rice evenly with the egg strips. Garnish with the scallions, jalapeño slices, sesame seeds, lime wedges, and red pepper flakes, if desired.

Recipe: Five Spice Pumpkin Pie

2021 Week 23 Newsletter

Instead of writing it all out, this week I thought I'd link right to the Smitten Kitchen recipe we love to make in my house - pecan topping optional! You can click right on this text and it will take you there, or copy and paste the link below.

A quick google search will bring up directions to easily turn your own pie pumpkin into homemade pumpkin puree! We usually say that each pound of pumpkin yields about 1 cup of puree - and ya'll pumpkins are around 4lbs each (give or take). Hopefully that helps you decide how to use it!

-Alice

A note from Rae: Feel free to use the tried and true holy trinity of nutmeg, ginger, and cinnamon, but if you want to mix things up a bit, sub in Chinese Five Spice Powder and wow your fellow diners with touches of anise and a subtle zing of Sichuan pepper! 2 or 3 tsps is usually just right.

https://smittenkitchen.com/2014/11/classic-pumpkin-pie-with-pecan-praline-sauce/

Recipe: Warm Radicchio, Cauliflower, & Apple Salad

2021 Week 22 Newsletter

Recipe from Lauren Feldman

Preheat Oven to 450°. Slice the Cauliflower vertically in 1” thick slices through the core so that it stays in large pieces. Oil a sheet pan and sprinkle with some sea salt. Lay down the cauliflower, drizzle with some more olive oil and sprinkle with some more salt. Roast in the hot oven for 20 or so minutes. The cauliflower should be cooked through but not mushy and should have some nice caramelization

While the cauliflower is roasting make the vinaigrette.

30 grams minced shallot

100 grams Apple Cider Vinegar

8 grams salt

Let the shallots macerate with the vinegar and salt for 10 minutes. I like to do it in a mason jar so that I can shake the dressing vigorously.

Then add:

15 grams Dijon or Coarse Mustard

20 gram honey

120 grams Extra Virgin Olive Oil Black Pepper to Taste Shake to blend.

Taste! The vinegar you use might be different from the one that I used! You may need more oil, honey, mustard or salt.

Char the radicchio. Chioggia radicchio is good for grilling or charring because the heads are generally dense like cabbage. But try another type if that’s what you have!

Take off the outer loose leaves. Don’t throw them away! You can use them for another salad. Cut the radicchio in half, through the core. Then, depending on the size, cut each half in 4 to 6 wedges, through the core so that they somewhat stay together in one piece.

Drizzle olive oil on the radicchio and sprinkle with some salt. Char on a hot cast iron skillet until lightly blackened. Flip over and do the other side. Transfer to a cooling rack.

Peel an apple that has bright acidity and firm flesh, like a pink lady. Slice into wedges, toss in a little butter or better yet, brown butter, and roast in the hot oven until cooked through-not too mushy!!

Rough chop the cauliflower and radicchio. Toss with the apples and some of the vinaigrette. Sprinkle with toasted bread crumbs (I used rye), dill and finishing salt. Delicious warm or at room temperature!

Recipe: Radicchio Pesto

2021 Week 22 Newsletter

Radicchio is tasty in so many preparations, but if you're new to this bitter veggie and need a gateway recipe, this is a great one to try (plus it is a lovely pink color)! Unlike a typical basil pesto, the radicchio is sautéed before pureeing and this (along with the fat, salt, and lemon) helps to temper its strong flavor. Try with pasta or on top of bruschetta!

~Rae

1 head radicchio, roughly chopped

1 clove garlic

½ an onion or shallot

¼ cup walnuts or pinenuts

½ cup olive oil

⅓ cup parmesan cheese

salt and freshly ground pepper to taste

Sautee the radicchio and onion until soft and wilted then puree all ingredients in a food processor or blender. Taste and add salt and pepper.

Recipe: Beet & Fennel Soup

2021 Week 22 Newsletter

Recipe & Pic from Dishing Up The Dirt

A deliciously unique soup that will make the most of both your beets and fennel!

2 Tablespoons butter

1 large yellow onion, finely chopped

1 large fennel bulb, finely chopped

2 teaspoons fennel seeds

fat pinch of salt

3 large beets, cut into small chunks

1/2 cup dry white wine

2 1/2 cups water (plus more to thin if needed)

1 cup whole milk plain yogurt

fennel fronds for garnish

Heat the butter in a large dutch oven over medium high heat. Add the onion, fennel, fennel seeds and salt. Cook stirring occasionally until the veggies begin to soften, about 8 minutes. Add the beets and stir to coat. Pour in the wine and bring to a boil, reduce the heat and and simmer until most of the liquid has evaporated. Add the 2 1/2 cups of water and bring back up to a boil. Reduce the heat and simmer for 20 minutes or until the beets are tender.

Carefully transfer the soup to a blender, add the yogurt and blend on high until completely smooth. Season to taste with salt and pepper and serve warm. (If the soup seems to thick add a little more water to thin to your desired consistency).

Recipe: Chermoula Roast Cauliflower

2021 Week 22 Newsletter

Recipe and Pic from Olive Magazine

This recipe calls for roasting a cauliflower whole, which it quite lovely presentation-wise, but if you prefer you can slice yours into thick “steaks” before roasting which will cook much more quickly!

1 cauliflower, trimmed

2 tbsp tahini

2 tbsp plain yogurt

1 tbsp, toasted pumpkin seeds

Chermoula

handful, finely chopped flat-leaf parsley

handful, cilantro finely chopped

2 garlic cloves, crushed

1 tsp smoked paprika

1 tsp ground cumin

1 lemon, zested and juiced

olive oil

To make the chermoula, mix the herbs, garlic, spices, lemon zest and juice with 3 tbsp oil and a good pinch of salt.

Heat the oven to 400 degrees Brush the cauli with oil and season then put on a baking tray and roast for 30 -40 minutes or until tender. Take out, spoon over the chermoula and leave to sit for 5 minutes.

Meanwhile, mix the tahini and yogurt with enough water to make a drizzleable sauce and season. Lift the cauliflower onto a plate, drizzle with the tahini sauce then finish with a scatter of toasted pumpkin seeds.

Recipe: Black Futsu & Radicchio Salad

2021 Week 21 Newsletter

Recipe & Pic From Eat Winter Vegetables

This recipe calls for Futsu but feel free to incorporate any variety of roasted winter squash that you like! Click on the recipe title above to link to the Eat Winter Vegetables website where you can watch a video on prepping this salad (as well as check out some other awesome cool-season recipes!)

For The Salad

1 small Black Futsu squash, ripe (this squash is ripe when tan/orange)

2-3 small heads of Treviso (or radicchio), washed

1 “grateable” chunk of Pecorino to yield about 2/3 cup grated

High-quality sea salt such as Jacobsen Salt or Maldon

Fresh black pepper

For the Citronette

1/3 cup fresh squeezed lemon juice

1/3-1/2 cup good quality extra virgin olive oil

1 shallot, very gently and finely diced

1 clove garlic

4 anchovy fillets, packed in olive oil (for a vegetarian version of this dressing, sub ½ head roasted garlic for anchovy)

Salt

Prepare the citronette – Combine the minced shallot and lemon juice in a bowl, season very lightly with salt and set aside. Finely chop the anchovy and garlic until a paste forms, combine with lemon/shallot mixture. Gently whisk in olive oil until just combined. This can be prepared up to a week ahead.

Prepare the squash – Cut the squash in half lengthwise, remove seeds. Tightly wrap and refrigerate one half for another use or tomorrow’s salad. Cut the remaining half into two or three wedges and peel/cut away all skin from their exterior. Very carefully, slice the wedges very thinly (think the thickness of 4-5 sheets of notebook paper stacked). Season with salt very lightly in a bowl and set aside.

Compose the salad – Cut the Treviso/radicchio into thin strips and toss gently in a large bowl to separate. Gently “squeeze” the sliced squash to remove any excess moisture then add to the Treviso/radicchio bowl, mix gently and season lightly with salt and pepper. Liberally dress with the anchovy citronette and transfer to a serving dish. Grate Pecorino over the top (don’t be shy!) and finish with more cracked pepper.